To finish up our Klee project with the First Grade classes, we did a color wash.
This is really simple to do...
I pop out some black watercolor ovals from the Prang sets, place them in a dish and pour some water over them. I do this so there is NO temptation of mixing other colors into the black paint....saves me some clean up in the long run.
I only let 6 to 8 students paint at a time. It helps keep a little control of the black paint. As they finish covering their picture with the watercolor wash, I use a rag to wipe the puddles off and then into the drying rack.
Check out the awesome art!
Showing posts with label Paul Klee. Show all posts
Monday, September 30, 2013
Hot Days - Cool Klee
I love the beginning of the year with First Grade classes. We get to look at the art of a very cool artist named Paul Klee (pronounced Klay.....do you get the reference now of Hot Days - Cool Klay?)
He used the greatest shapes and awesome colors in his art.
Learn more about Paul Klee here.
We started in class with an idea of Continuous Squares. I forgot to snap a picture of this, so bear with me..... I made a little jpeg image.
I do remind the kids to fill the space of the paper.
We don't touch the edge or let the lines run off the edge.
Then the students start to add color. We talk about color and color choices. Bright colors are a great choice for this project, but I don't want to give them too many clues about what is next. I just try to steer them away from coloring with black crayon. I use an excuse that I really LOVE to see the black line of the squares. We also talk about trying to color some of the squares white....we just have to remember WHICH squares we choose for the white crayon.
The shinier the crayon on your paper....the better.
He used the greatest shapes and awesome colors in his art.
Learn more about Paul Klee here.
We started in class with an idea of Continuous Squares. I forgot to snap a picture of this, so bear with me..... I made a little jpeg image.
![]() |
| Once the crayon starts moving..... |
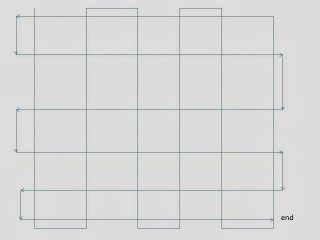
![]() |
| Keep it moving until the squares are complete. |
We use a black crayon to start.
No mistakes - remember?
......no erasing either.
I do remind the kids to fill the space of the paper.
We don't touch the edge or let the lines run off the edge.
Then the students start to add color. We talk about color and color choices. Bright colors are a great choice for this project, but I don't want to give them too many clues about what is next. I just try to steer them away from coloring with black crayon. I use an excuse that I really LOVE to see the black line of the squares. We also talk about trying to color some of the squares white....we just have to remember WHICH squares we choose for the white crayon.
And then we start to color
HARD,
HARD,
HARD!
The shinier the crayon on your paper....the better.
Subscribe to:
Posts (Atom)


